|
As of July 1, 2021, the WFR Remote Extension course has been discontinued. We are excited about the return to in-person courses.
Covid-19 has put a strong pause on many things in 2020, with the hopes that we can just pick up where we left off when it is safer to do so. While we may just be able to postpone a haircut or vacation, that pause has also wreaked havoc within the wilderness medicine industry since so much of the certification process relies on in-person coursework and practice. Blanket, long-term extensions are not the permanent answer as skills continue to decline unless they are refreshed and practiced. For many people, in-person courses are not available or not a realistic option, yet they still need to keep their WFR certification valid. Longleaf Wilderness Medicine has designed and implemented a one year certification extension that is fully online and self-paced and includes interactive elements. With a focus on three key learning foundations, participants walk away from the course with refreshed knowledge and skills - and a valid WFR certificate.
Review
We typically hope that people do not have to use the wilderness medicine skills that they learn, at least beyond the caring for minor wounds, gastrointestinal distress, musculoskeletal injuries, and general aches and pains that commonly arise when recreating. A WFR Recert course is designed to include extensive review of less commonly used assessment and treatment guidelines. Knowledge review is present in a few forms in the WFR Remote Extension. Including short text readings, whiteboard lectures, and practice quizzes, participants are able to review up-to-date medical information and best practices and refresh information from previous courses. The review component also includes scenario review where participants can watch LWM instructors work through the response and assessment process.
Practice
It is not enough to review information; the muscle memory required for in-depth response, assessment, and treatment also needs to be stretched. The WFR Remote Extension course includes interactive scenarios filmed to provide a first person perspective where participants direct the response and choose your own adventure style case studies.
In addition to guiding response as part of a set scenario, the WFR Remote Extension course includes outlines for at-home skills and scenario practice. Our guides allow the quick set up of a friend or family member as a patient to support response review and practice.
Demonstrate
The last piece of the WFR Extension course is the demonstration of a full patient assessment. Participants film themselves responding to a pre-determined scenario and skills checklist that is then submitted to LWM for review. LWM instructors provide specific feedback based on the demonstration of skills, with the result being either a full pass or allowing for a resubmission with feedback applied. Previous course participants have rated the patient assessment demonstration as a key component to their learning; with the submission review requirement, participants have stated that they knew they had to hold themselves to a high standard and ensure that they were completing the whole patient assessment process without shortcuts. To ensure that participants are still receiving key feedback on their response skills even without in-person meeting, LWM instructors provide specific, in-depth feedback to the response videos and are available through discussion boards and email throughout the duration of the course.
Moving Forward
We are looking forward to returning to in-person instruction and continuing to support the development of confident, skilled backcountry medical response. In the meantime, there are options for keeping a Wilderness First Responder certification valid. Whether you are an LWM alum or hold a WFR from another organization, we hope that you will join us for the course.
1 Comment
Updated 9/12/2021
Understanding how our bodies create, maintain and lose heat is key to preventing hypothermia. By taking a few proactive measures to make sure that the body is able to optimize heat generation and maintenance, outdoor ventures in cool and cold climates can be safer and more comfortable. The body produces heat by metabolizing the energy in the food we eat, making it important to remain well fed and hydrated before, during and after participating in activities in cold environments. Ensuring regular consumption of calories throughout activity as well as eating meals with a balance of carbohydrates, fats and proteins will provide adequate energy to keep the internal furnace burning. Proper hydration supports consistent blood volume and regular circulation of blood throughout the body and ensures that this warmth travels to the extremities and skin. In order to retain the heat generated by the body, it is important to wear proper clothing for the environment. Using a layering system that includes nonrestrictive, dry materials will allow for a clothing system that can be adjusted throughout the activity depending on the conditions and level of exertion. The goal is to stay warm without sweating in order to avoid the resulting chill of evaporative cooling. Individuals should add and remove layers consistently to achieve warmth without sweating. Recognizing the symptoms Mild hypothermia occurs when the core body temperature decreases. Individuals experiencing mild hypothermia can present with signs that include violent shivering, pale, cool skin and a series of changes often referred to as the “umbles”: stumbles, grumbles, mumbles, and fumbles. Early recognition of these symptoms in ourselves and our group members is key to treating hypothermia in its mild phase. A patient with mild hypothermia can be treated as follows:
Additional Information All LWM courses, including the self-paced and fully online Outdoor First Aid course, provide detailed information on the body’s response to cold and cold injuries. In order to safely spend time in remote locations, it is necessary for preparations to include appropriate medical training and the creation of a first aid kit with supplies to assist in the case of an emergency. It is important to know how to design a kit that meets the needs of each individual or group and to understand that there is not one perfect kit for all travel. In order to create a first aid kit that meets the needs of each trip you take, LWM encourages you to consider the following:
The Non-Negotiables The practice of wilderness medicine teaches improvisation, but there are a few items that are hard to improvise effectively. Emergency response can place you in a situation where you come in contact with body substances such as blood, vomit, feces and urine. Taking universal precautions is the practice of protecting your exposure from these substances to limit the risk of disease transmission. Non-latex gloves and a CPR mask should be considered mandatory items for even the smallest first aid kit. First aid kits are not “buy it and forget it” purchases. Items get used, wet, hot, cold, expire, and dirty due to all of the places that you take your kit. Ensure that you have the appropriate items available when you need them by periodically inventorying your first aid kit and restocking items that are used, worn out, or expired. Acquiring a kit The simplest way to get your first medical kit is to purchase a commercially made kit from an outdoor retailer. Commercially designed kits use names or numbers to indicated the kit’s intended use. Purchasing a pre-made commercial kit allows the purchaser to get most of the necessary items along with a carrying case without having to purchase full boxes of many of the items for the kit. As you look at which kit to purchase and maintain, ask yourself the following questions: Who are you traveling with? Do you travel with groups, adults, kids or solo? The more people you travel with the more opportunities present themselves to use the items in your kit. With group travel, consider adding additional reserves of commonly used items such as adhesive bandages and pain relievers. For expeditions with adults at risk for heart conditions, ensure that aspirin is in the kit. Additionally, you may consider adding a dental kit with temporary filling for adults with a history of tooth issues. If kids are on the trip, small items like bandages with cartoon characters or a small toy can go a long way to decrease their stress. How long will you be out? Ensure that you have an inventory that matches the length of your trip . For longer trips, increase the number of common use items such as bandages, athletic tape, non-latex gloves and over-the-counter medications. The number of these items can be decreased on short day trips. On day trips to remote environments, consider bringing an emergency blanket in the case that injury lengthens your trip resulting in an unexpected overnight. What type of activity are you doing? The items carried in a first aid kit should match the potential illnesses or injuries that are associated with the activity. Hikers commonly experience blisters and musculoskeletal injuries, making it beneficial to have kit including bandages, mole foam, an elastic wrap and pain relievers. A nail clipper in a first aid kit can also can reduce many potential foot issues when on trail runs, day hikes, or backpacking trips. Boaters can add a small container of high strength sunscreen and sunglasses to reduce the potential of sunburn from the reflection of the sun on the water if they run out of (or forget) sunscreen or loose their sunglasses. What is your level of training? It does not make sense to carry items in your first aid kit that you do not know how to use. If there is something in your kit you do not understand, take time to research what the item is used for and how to use it appropriately. In addition to your current understanding of medicine, consider adding knowledge to what you carry with your first aid kit. Sample First Aid Kit Inventory If you need a place to start, check out LWM's first aid kit inventory list designed for a multi-day trip. Using this as a starting point, you can adjust what you carry based on all of the topics listed above. The LWM store is set up to support the purchase of small quantities of the items on the list to ensure that stocking a kit does not require a huge investment. Longleaf Wilderness Medicine courses address how to create first aid kits that will allow for response to minor and major emergencies. Check out a LWM course to develop your assessment and treatment skills for when the unexpected happens. Outdoor recreation in the winter, including backcountry skiing, cross-country skiing, snowshoeing, and mountaineering, can be rewarding and enjoyable, as long as precautions are taken to mitigate risks. Freezing cold injuries, such as frostnip and frostbite, can quickly turn an adventure from a fun time into a serious incident. These types of injuries occur when heat loss in tissues exceeds the body’s ability to adequately perfuse them and prevent freezing (blood flow = heat). In cold temperatures, blood is shunted to vital organs in the core and away from the extremities, thus increasing the chance of a freezing injury. Prevention Prevention is always better than treatment. Prior planning and frequent assessments are key to frostnip and frostbite prevention.
Frostnip Frostnip is the precursor to superficial frostbite. Prior to warming, skin is cold, numb, and can have the appearance of frost on the surface. After warming, skin becomes red. With quick action, frostnip is easily reversible and results in no tissue damage. Superficial and Partial Thickness Frostbite If frostnip is not treated, freezing begins to occur in subsequent layers of tissue, and more permanent damage is possible. Signs of superficial frostbite include pale, “waxy,” skin, numbness, and tingling. The tissue may have no sensation and will feel cold to the touch. After rewarming, tissue will swell and become painful. In the case of partial thickness frostbite, clear, fluid-filled blisters appear. Deep Frostbite Deep frostbite affects all layers of skin, and in severe cases can cause damage to muscle and bone. When frozen, tissue can appear frosted, and is stiff to the touch and does not have sensation. Once rewarmed, deep frostbite is characterized by hemorrhagic blisters or necrotic (black) skin. It can take weeks to months before demarcation of damaged tissue is complete, which often results in amputation. Before rewarming, it is difficult to differentiate between superficial and deep frostbite. Treatment Frostnip – Rewarm the affected tissue by covering exposed skin (e.g., putting on gloves, covering your face clothing or a scarf), direct contact (e.g putting cold hands in your armpits), and finding shelter/limiting exposure to the elements. Frostbite - If there’s a possibility of refreezing, or if evacuation necessitates a walk-out, it’s better to keep the body part(s) frozen than to rewarm them. Refreezing substantially increases the risk of permanent damage and defrosted appendages are often swollen, blistered, and painful. However, tissues should not be intentionally kept frozen (i.e., the affected area should not be packed in snow) as it can result in further damage. If there is no chance of re-freezing, there are two rewarming options: Rapid rewarming (preferred) - Rewarm the tissue in a water bath kept consistently between 98.6 and 102.2°F (bathtub temperature). Circulating water helps to keep tissues at the correct temperature. Rewarming time depends on the extent of the freezing, but is complete when tissues are re-perfused and soft/pliable. After rewarming, dry the affected tissue with gentle blotting or let it air dry. Keep blisters intact, and if they drain spontaneously, provide basic wound care. Passive rewarming – While not as ideal, passive rewarming options can also be effective. These methods include moving to a warmer environment (sleeping bag, cabin, sitting next to a stove), or using body heat (placing affected tissue against someone else’s abdomen, or placing hands in your own armpits). Any individual who experiences a frostbite injury that cannot be rewarmed should be evacuated immediately. If the tissue is rewarmed, provide wound care and evacuate in a timely manner. Caitlin GaylordI peeked out the window of the Fairy Meadows Backcountry hut in B.C., Canada. I was hoping to see the mountains that had been hidden from view for the last four days. I smiled. Doubletop Mountain and Sentinel Peak were outlined against a backdrop of blue. It was January 11th, 2018. A few months prior, a family friend and owner of the Seattle guiding company Kaf Adventures, Mick Pearson, had won a permit to spend a week at a remote backcountry ski hut in the heart of the Selkirk mountains. So here I was along with my father, Mick, two additional Kaf guides, and five other skiers. I had new ski boots that were adjusted and custom-molded to my feet, and I had taken a few practice laps at Snoqualmie ski resort in Washington. The boots were comfortable then, but on the first day of the hut trip when I put my boots on, the inner lining pressed down on my big toenails. It was a little uncomfortable, but I ignored it. Looking back, this is when the trouble started. Before our first run on the second day of skiing, I forgot to toggle the lever on my boots that changes them from “walk mode” to “downhill mode, which creates stiffness and stability. An experienced resort skier but novice powder skier, I skied the run leaning too far back, flexing my feet against the boots. The next morning, my big toenails were sore and bruised so I took the day off. When I woke up on the 11th, my toes were less sore, and the clear skies were irresistible. With the cloud layer lifted, the temperature had dropped to -2°F. We layered up, discussing the importance of keeping breaks short and checking each other for signs of frostbite. Within the first 20 minutes of heading uphill, my toes tingled as they started to get cold. No problem, I thought. My toes had been cold the previous days, plus, the numbness would dampen my sore toenails. I was oblivious to the moment when the feeling in my toes went from painful and cold, to painless and cold; a crucial distinction that I, as an REMT, should have been aware of. With avalanche danger more tangible, I wasn’t thinking about my cold feet. It wasn’t until we neared the cabin after a six-hour ski tour that concern crept into my mind. When I wiggled my toes, I felt nothing. We came inside the cabin and I removed my boots and socks. The big toe on my left foot was completely white, cold the touch, and hard as wood, classic signs of frostbite. Like hypothermia and heat illnesses, frostnip and frostbite occur on a spectrum, and prevention is the best treatment. There were multiple mistakes I made throughout the day:
Because of these decisions and lack of action, I was now facing a bigger problem. Once I realized I had frostbite, others in the cabin helped evaluate the situation and strategize treatment. Since the hut was warm, we were isolated from the environment, and we wouldn’t have to walk or ski out, we began rewarming. I was extremely lucky we had ideal rewarming conditions. Despite our remote setting, we were able to rapidly heat water and had plastic basins that served as “hot tubs” for my feet. I spent the evening with my feet in hot water watching them turn from white, to purple, to red. Sometimes this process is called the “screaming barfies” as the pain associated with rewarming makes people want to scream and barf. While it wasn’t a pleasant experience, I don’t remember intense pain, though that may have been because of the Ibuprofen I was given. Within a few hours of rewarming, small blisters formed on my left big toe. One of the guides looked out the window and commented, “Well, it’s probably too late for a helicopter evacuation.” The mood in the hut shifted; suddenly my situation became more serious. I sat down with the guides and talked through the options. The helicopter (the only way in and out) would be coming in two days to pick us up as scheduled. There was a chance that the helicopter would be delayed by at least a day because of weather. Mick called a Kaf co-worker via satellite phone for an updated weather report. There was a slight chance of bad weather impending our travel, but it seemed relatively stable. The fluid in the blisters on my toe was clear, which meant there likely wasn't permanent tissue damage (often indicated by blood-filled blisters), but it was hard to know. A former ER physician who was a member of another party in the hut examined my toes. “I wouldn’t be surprised if later down the road you lost your toe,” he told me. In wilderness medicine, there is typically an element of uncertainty when making decisions. Location, weather, and availability of resources (communication, basic supplies, first aid material, human power, etc) can all complicate treatment and evacuation plans. Rarely is there a “right” answer, so we chose the “best” answer given what we knew and what we had. We decided to stay in the hut and await the scheduled helicopter, knowing there was a chance it could be delayed. We treated my toes as best we could given our resources and limitations, knowing the recovery might be better with definitive care. I was fortunate to have the best possible outcome. I flew out by helicopter as scheduled two days later and although both my big toenails were surgically removed eight days later, I didn’t suffer any permanent damage. Nine months after the ski trip, my toes and toenails were back to normal. I also learned important lessons about identifying and preventing frostbite that will not only help me but others who I hike and ski with in the future. Caitlin GaylordThankfully Caitlin, an LWM instructor and current med student, still has all 10 of her toes. Prevention and Reaction: Tips for Preventing Backcountry Rescue and what to do if rescue is needed8/17/2020 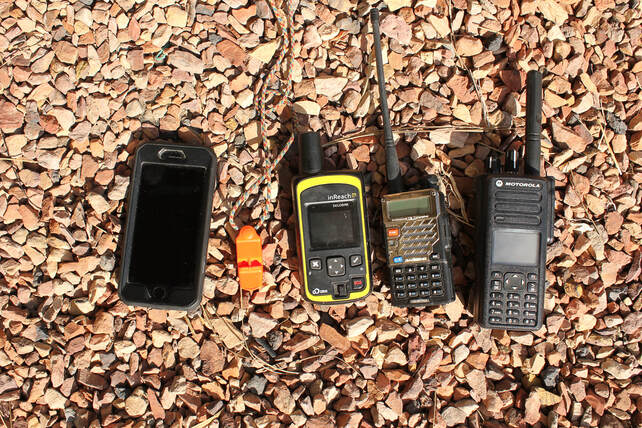 Backcountry rescues are logistically challenging and time consuming. However, having basic knowledge of the search and rescue (SAR) process and following a few important steps can help facilitate a smooth rescue. Proper advance planning before any trip helps prevent accidents. It also increases the likelihood that you and your companions won’t have to face the challenges of an evacuation or figure out a rescue plan. Use the following guidelines to prepare for your next adventure:
However, even with advance planning and preparation, emergencies and injuries can still occur. When you respond to an incident, whether it’s someone in your group, or a nearby party that needs help, first follow the Scene Size-Up, Initial Assessment, and Focused Assessment steps of the SIFT framework taught in Longleaf Wilderness Medicine courses. After the patient(s) is stabilized, depending on the severity of the accident, current location, and distance from a trailhead, you will have to make a decision about whether or not to evacuate and develop a plan. For minor injuries such as sunburns, bug bites, or small wounds, this decision may be simpler. However, it’s important to come up with a contingency plan based on anticipated problems if the situation escalates. For more severe injuries or for rescues that require skills beyond those of your group, a rescue will require additional resources. Several options for rescue include:
The goal of an evacuation is always to limit risk for everyone involved and minimize the time, energy, and resources required. If you’re facing a potentially serious situation and are debating whether or not to call 911, make the call. Nick Constantine, Chairperson and team member for Seattle Mountain Rescue says, “It’s not worth hedging your bets, and in most places in the U.S., SAR teams are free of charge, so you should always call.” If you have poor cell service and have a hard time reaching 911, Constantine suggests, “Just keep calling back, even a few seconds of a series of poorly connected calls can convey the message that something is wrong.” Before calling, take a few deep breaths and plan out what you’re going to say. Use a SOAP note template or SIFT as a framework for organizing your thoughts clearly and concisely. Always start the phone call by stating your name, where you are, and a “one-liner” that sums up your situation and/or the severity of the injuries. Constantine adds, “Provide as much information as you can, and be specific.” The 911 Dispatcher typically contacts the Deputy or Sheriff, who will then contact the local SAR agency or potentially the Fire Department. If necessary, the Deputy or Sheriff, or the rescue team, will contact you directly to start the rescue process. While a phone call is ideal, satellite messaging devices such as the Garmin inReach and SPOT devices are also effective options. Both devices have the ability to send an SOS message to an emergency response center, which then tracks your device and can notify responders in the area. Some devices allow you to send a pre-set custom message to friends and family (e.g. “I made it to the summit!”) or a message that you’re okay, but someone else is injured and needs help. Other satellite messaging devices feature two-way communication, which allows you to provide critical details about the nature of the emergency, updates on a patient’s condition, and be in direct contact with rescuers. Constantine notes that “for devices with simpler features, or just an SOS button, this can add an extra step as rescue teams then won’t know if something catastrophic or something more minor... but at the end of the day the call for help will get to the National Park or the Sheriff and teams will respond to assist.” Before you head out, make sure you know the capabilities of your equipment and how to use them. There is also a possibility that you cannot make contact with anyone. Ideally, you’ve given someone your trip itinerary ahead of time, and they could start the rescue process if you didn’t return or make contact when you were supposed to. In the meantime, if you’re in the field and unable to reach anyone, there are several things that you can do:
Even if you have made contact, in the best-case scenario, rescue is a slow process. It takes time to relay the information, assemble the team, make a plan, and then reach you. Trust that they are trying to get there as fast as they can. Once the team reaches you, evacuation can still be a lengthy process. Extrication from a tricky spot can be extremely complicated, especially if someone is badly injured. Carrying someone out on a litter can take four to six times as long as hiking on an easy trail, and even longer on a more difficult route. Additional considerations also have to be made for weather, terrain, availability of team members, and rescue supplies. Sometimes, even if a helicopter can be deployed, it may not be able to land, or might have to come back at a different time due to weather conditions or time of day. Planning ahead, thoroughly assessing a situation, making thoughtful decisions, and staying calm will help streamline a safer and quicker rescue process for everyone involved. Need to know more? Access LWM's online Remote Communication lesson now! Caitlin GaylordCaitlin teaches wilderness medicine because she believes in empowering others to be prepared in the backcountry. Outside of work, Caitlin spends time rock climbing, running, writing, and trying new bread recipes. Prevention Strategies We spend significant time focusing on prevention during our classes. It’s an essential part of planning any trip to identify the risks that can be prevented, reduced, or managed. It is faulty to assume that accidents, injury, and illness are an inevitable outcome of travel into the backcountry. This emphasis ensures a better experience, reduces strain on medical systems, and reduces serious negative outcomes that could have been avoided. Preventing tick bites is the best way to reduce the chances of acquiring a tickborne illness. Together, four actions work to reduce the risk.
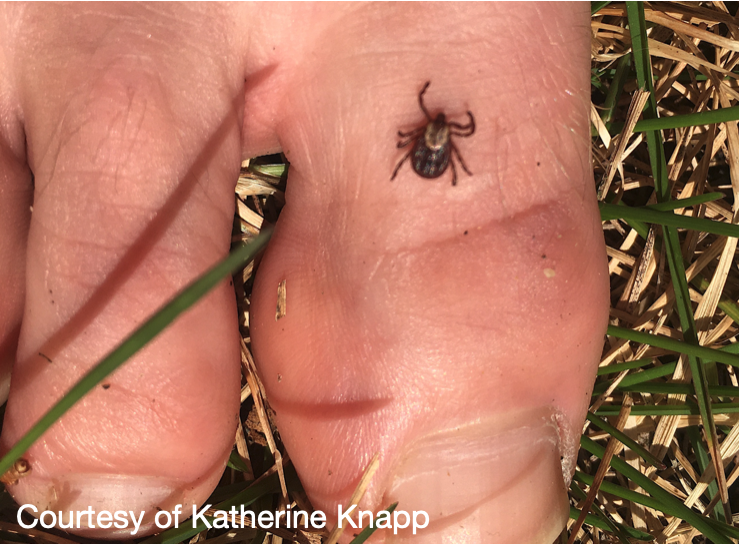
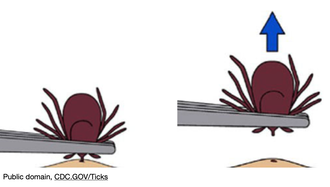
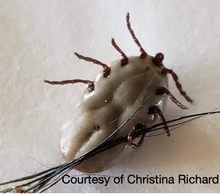
Removing an Embedded Tick If you do find a tick attached to your body, don’t panic. Not every tick will be carrying disease (this varies regionally). It takes at least six hours (Rocky Mountain spotted fever), but generally 24-48 hours (other diseases) of attached time for disease transmission. The sooner you find a tick and remove it, the better. To remove, use tweezers or a tick removal tool to grasp the tick as close to your skin as possible. Pull away from the skin surface with steady pressure until the tick comes out. If any mouth-parts remain in the skin, you can go after them with the tweezers. It is not necessary to save the tick for ‘testing’, but consider trying to identify what type it was. Dispose of the tick and wash your hands and tweezers with soapy water. Caring for a Tick Bite Gently wash the area with soapy water. You can apply antibiotic ointment to a bandage and cover the wound. As with any skin injury, it is important to change bandaging regularly and monitor for signs of infection. Be alert for any signs of tickborne illness. These may present up to several weeks after the bite. 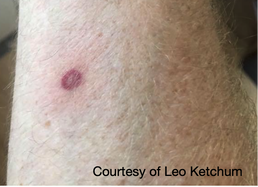 When to Seek Medical Care Tickborne illnesses typically present with one or more of the following symptoms within several weeks:
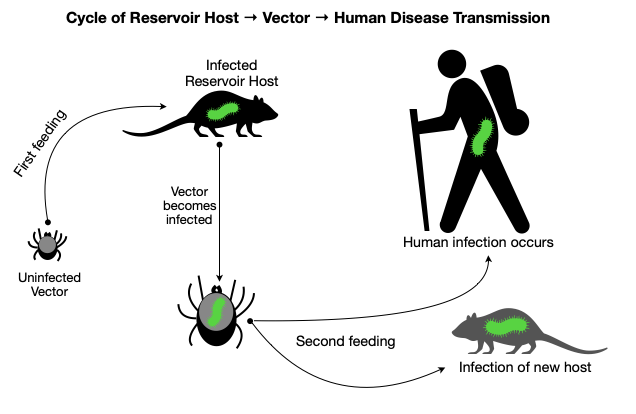
If you experience any of these symptoms after a tick bite (or suspect you could have been bitten), seek out medical care. It is important to explain to the provider that you suspect a tick bite. Tickborne illnesses are treatable, but early diagnosis and care lead to better outcomes. Where to Find More Information: Justin BrewsterWhen not working, Justin enjoys mountain biking, skiing, paddling whitewater, and chasing big waves on Lake Superior. Having begun his next adventure - Physician Assistant school - he's looking forward to continuing practicing medicine in remote environments, whether that's serving rural communities or on an expedition. 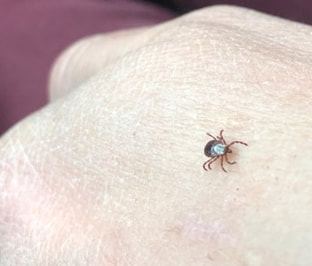 Every spring, the annoying sensation of something crawling up my leg reminds me of a tiny yet ever-present hazard found in the Northern forests. After a furious search for the offender, I quickly remove a tick before it has a chance to embed in my skin. I am now on high-alert because tick season has begun. While we can all relate to the displeasure of an unwanted creature creeping on our skin, the real hazard presented by ticks is not visible to the naked eye. Ticks are the leading cause of vector-borne disease in the United States because of their capacity to transmit microorganisms that cause illness in humans. Let’s spend some time reviewing the basics of tick biology, disease transmission, and current disease trends. In part two, we will dive into strategies for prevention, tick removal, and recommendations for when to seek medical care. The goal of these articles is for you to walk away feeling more knowledgeable and better prepared for staying safe this season. 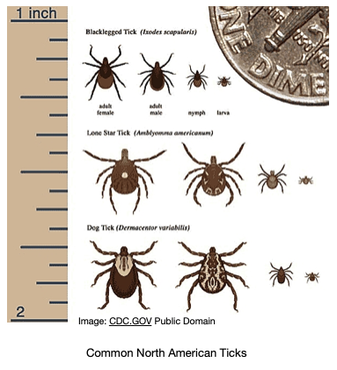 Tick Biology Basics Ticks have eight legs and and a hard body. They are classified as arachnids within the larger group of organisms known as arthropods (which also includes insects). Tick species rely on the blood of other animals for nutrition, so they are parasites. Ticks have several life stages after hatching from an egg: larva, nymph, and adult. Note the tiny size of the larval and nymphal stages (image, right) During each of these stages, they require one or more blood meals. This lifestyle is essential to understanding how ticks can transmit diseases to humans. When feeding on an animal (e.g., a white-footed mouse), a tick may acquire a disease-causing microorganism. Animals that host disease-causing microorganisms act as “reservoirs” because although they may not experience illness, they effectively pass it on to the tick. Once the tick moves on to feed on a human, it can transmit disease. So in this way, ticks act as an intermediary in the chain of disease transmission between animal reservoirs and humans. Less commonly, female ticks can directly transmit microorganisms to their offspring. Diseases Transmitted by Ticks Tick species known to transmit disease in the United States include the American dog (wood) tick, brown dog tick, Rocky Mountain wood tick, Pacific Coast tick, Gulf Coast tick, Lone Star tick, western black-legged tick, and black-legged tick (deer tick). The black-legged/deer tick (Ixodes scapularis) has the most significant role in disease transmission. In northern latitudes, ticks are generally active from March-November. More temperate regions experience year-round tick activity. Ticks can transmit bacteria, protozoa, and viruses that cause disease. The type and prevalence vary by region and tick species. The most commonly reported infections are listed below in order of prevalence:
Trends in Tickborne Illness and Impacts on Public Health Year over year, the US Centers for Disease Control and Prevention (CDC) have identified several consistent trends in tickborne illness:
The causes behind these observations are not entirely clear, but some likely factors include:
These trends raise the issue that tickborne illnesses represent a significant public health threat both in terms of scale and severity. For example, Lyme disease, the most prevalent tickborne illness, affects an estimated 200,000-400,000 people annually in the US. Issues with diagnosis and reporting make the actual number of cases challenging to measure. Powassan Encephalitis and Rocky Mountain spotted fever, while rare, present a substantial risk of severe illness or death. In general, theses conditions are challenging to diagnose. Symptoms may mimic other, more common illnesses and present several weeks after a tick bite. The tick bite itself may have gone unrecognized, and the healthcare provider may not be familiar with tell-tale signs of tickborne illness, especially in non-endemic regions. Lyme disease is easy to treat if discovered early, but a missed diagnosis may result in long-term effects, including permanent cardiac, joint, and neurological damage. Stay tuned for part two of this article series, where we will talk about the best ways to prevent tick bites, how to remove ticks, and when to seek medical care. Justin BrewsterWhen not working, Justin enjoys mountain biking, skiing, paddling whitewater, and chasing big waves on Lake Superior. Having begun his next adventure - Physician Assistant school - he's looking forward to continuing practicing medicine in remote environments, whether that's serving rural communities or on an expedition. With the identification that mental health is as important as physical health, LWM has been working over the past few years to increase the size and scope of our mental health curriculum. A specific focus on incorporating stress management has allowed us to encourage students to identify and manage the stress that patients and responders may face both during and after a rescue. Yet understanding stress and how to manage it are not unique to wilderness rescue; the current COVID-19 outbreak and the resulting uncertainty that each of us may face poses many of the same risks as any other stress injury. Any action we can take to limit the stress response in our body will improve our overall health during challenging times.
Stress The body has two response systems that are utilized based on our interpretation of the world around us, the sympathetic and parasympathetic. Sympathetic responses are the reaction to stress, often termed fight or flight. Parasympathetic responses are the opposite and can be thought of as rest and digest. When the body interprets a stimulus as stressful, the sympathetic nervous system (SNS) becomes active, resulting in an increase in the heart and respiratory rates, sweating, and a potential of increased acuity of senses (e.g., vision and hearing). The SNS also decreases the activity of the digestive system. Initially, this response is caused by the release of the chemical epinephrine. Long term, in addition to the epinephrine, cortisol is released. In the short term, stress is helpful - it allows for quick decision making and focus on completing tasks. In the long term, stress poses serious health risks as the body becomes fatigued, experiences poor sleep, and the immune system becomes dysfunctional, resulting in an increased risk of illness. The structure of the heart, vessels, and organs also can become damaged from the prolonged exposure to cortisol. The brain also changes and may result in emotional and cognitive effects such as development of negative thoughts and decreased focus, making day to day tasks more difficult. Managing Stress Stress is managed through coping, ideally in a manner supports health in both the short and long term. Healthy coping leads to a reduction of the sympathetic response, allowing our body to engage the parasympathetic system. In times of significant stress, we can work to manage stress with a few concrete actions. Meet Basic Needs Identify the basic needs and separate those from the non essentials. Adding stress to your life by worrying about toilet paper is probably not the best use of your time. Meet the needs of food, water, and shelter first. If these needs are not met, seek services that can help you meet the needs. When the basic needs are met, occasionally remind yourself that those needs are covered and that you are safe, and then begin working to find solutions for the non-essentials. Focus on the Things You Can Control Focusing on the items that you have no control over will not help your brain slow down. Instead, work to identify the components of your current circumstance that you do have control over and work to address them. If your current actions are causing stress, change your behavior. Turn off the constant stream of news updates. Set ground rules that meet the needs of all people in the house during the time of social distancing. Find ways to create routine in days that may lack structure. If you are currently under order to stay at home, find ways that you can meet your needs within that space. Create a space in your home where you can be active and research an online resource that can provide direction in movement. Use available time to plan an adventure when it is safe to be outside again. Use online virtual tours to take in the sights of a national park or a webcam to watch wildlife movement. Move a chair to the window to allow more connection to the outside, and, if weather allows, open the window to allow fresh air into your space. Social Support Find ways to build social support into your day. It is going to look different when socially distancing, but it is still possible. Increase the number of calls you make to loved ones. Schedule a virtual happy hour with friends. Make sure that you and your social network are actually communicating and not just scrolling through the photos people are posting. Last night my wife and I shared our dinner photos with friends and in return saw their dinner. It almost felt like we had a kitchen full of friends. The uncertainty of the current health crisis creates the potential for significant stress in our lives. Take time over the next days and weeks to change focus, prioritize needs, and make social connections. Using these simple steps can help each of us reduce the impacts of long term stress and face the current challenges to the best of our ability. Turning around due to risk while pursuing an objective is difficult. The choice contrasts the perceived risk with a very enticing reward. The difficult part is that the risks can be hard to identify and there is often no positive feedback for choosing the less risky path. We make choices to not ski a specific slope due to avalanche danger or to not climb a specific ridge due to the risk of a storm, but because the choices we make are intended to keep us safe, we rarely see the consequences of the things we choose not to do - we don't often see the avalanche path in an area we chose not to ski or see ridge we chose not to climb get struck by lightning.
Many years ago I led canoe expeditions on the coastal waters of South Carolina. One of the most difficult decisions I made was to not to make a big water crossing with a group of students during a storm. As a group of 10 people with a variety of abilities, we were in an exposed position in shallow water along a barrier island with a large incoming thunderstorm, with a half mile of open water between our position and a boat ramp with a waiting transport vehicle. We had to make the decision to stay along the shore, get into lightning position and wait, or make a run for the security of the vehicle. I so wanted to be in that vehicle. I was tired, we had been in storms for the past 12 hours, and I knew the van provided security that we did not have on the water. We followed the program’s policy regarding lightning, stayed in position and waited. After an hour of intense lightning, the storm broke up and we paddled to the van. The feedback that I got from the students was all negative. They didn’t see the risk of making the crossing but they did experience the discomfort of the storm. The feedback from the program staff in the van was “that looked un-fun.” More than 15 years later, I wonder if we could have made the crossing and limited our exposure in that storm. However, I can’t think of that alternate decision without wondering what would have happened if a canoe flipped during the crossing or if someone had been struck by lightning when we broke program policy to “just get to the van.” The art and science of decision making in our outdoor pursuits involves a combination of identifying all of the risks, seeing the consequences of those risks, and then making a decision based on our overall risk exposure, individual skillset, and risk tolerance. The more we understand about the given risk the better we can choose an acceptable level of risk. With the current COVID-19 outbreak we find ourselves in a time of decision making about how to interact with the world. We are surrounded by a lot of poor information regarding the overall risk and many people have a ton of temptation due to increased free time. I have begun seeing photos of people out recreating on chair lifts and on trails using the tag #socialdistancing, and have watched online conversations where people are considering recreation-based road trips. It’s time for each of us to assess the real risk of the current health emergency to ourselves, our communities, and the rest of the world. The Risks LWM is based in Bonner County, Idaho, population approximately 45,000. Our local hospital has 25 beds which include 4 in the intensive care unit (ICU). The Center for Disease Control (CDC) estimates are that most of the US population will contract COVID-19. If we conservatively assume that nearly half of the population contracts the virus, we will have 20,000 cases. Current estimates are that 80% of cases will be mild and not need hospital care. The remains 20%, or 4000 people, will need medical care. Again based on current estimates 25% of cases that need hospitalization will need the intensive care unit (ICU). That is 1000 people that need our 4 ICU bed. The statistics become more dire when noting that the estimated time in ICU is two weeks and half of ICU patients will need life support. Bonner County is not in a unique situation. It is hard to wrap your head around these numbers because to do so is to internalize that not everyone will have access to the care they need. Spread Assume you are going to interact with the virus. Furthermore, assume that you are probably not going to feel bad (i.e., have symptoms) when you do. The current “flatten the curve” mentality is about slowing the inevitable to limit the need of medical facilities at any given time. Each interaction we have with another person provides an opportunity to acquire the virus and then share it. Current estimates are that each person who carries the virus will spread it to an average of 2.2 people. Every interaction you have increases the chance that you have picked up the virus, with every interaction you have after acquisition risking further spread. The equation is simple, more interactions equals more potential spread. The spread is further amplified by being in contact with other people who have high levels of contact. Decision Making Similar to risk assessment in the backcountry, our decision of how to recreate over the next weeks will provide very little immediate feedback beyond the pros and cons of choosing to do any given activities. Unfortunately, the true risk in activity can feel abstract and unrealistic. I detailed the risk of numbers of people and the implications of space in the hospital system, because we have to be aware of the real risk to make function decision about our actions. I hope that we never see the full potential of this outbreak and that in a few years we look back and say we over reacted. I know today that I don’t want to be looking back in 20 years wondering if I could have done more to limit a rapid spread and resulting loss of life. We know that recreation, particularly in times of stress and uncertainty, is important but it is up to each of us to work each day to adapt our actions in order to limit transmission. At LWM we are suggesting that we each consider the following guidelines for recreating in the current outbreak:
Originally posted 3/17/20, Edited 4/1/20 Additional Resources:
|
Archives
December 2020
Categories
All
|


 RSS Feed
