|
In order to safely spend time in remote locations, it is necessary for preparations to include appropriate medical training and the creation of a first aid kit with supplies to assist in the case of an emergency. It is important to know how to design a kit that meets the needs of each individual or group and to understand that there is not one perfect kit for all travel. In order to create a first aid kit that meets the needs of each trip you take, LWM encourages you to consider the following:
The Non-Negotiables The practice of wilderness medicine teaches improvisation, but there are a few items that are hard to improvise effectively. Emergency response can place you in a situation where you come in contact with body substances such as blood, vomit, feces and urine. Taking universal precautions is the practice of protecting your exposure from these substances to limit the risk of disease transmission. Non-latex gloves and a CPR mask should be considered mandatory items for even the smallest first aid kit. First aid kits are not “buy it and forget it” purchases. Items get used, wet, hot, cold, expire, and dirty due to all of the places that you take your kit. Ensure that you have the appropriate items available when you need them by periodically inventorying your first aid kit and restocking items that are used, worn out, or expired. Acquiring a kit The simplest way to get your first medical kit is to purchase a commercially made kit from an outdoor retailer. Commercially designed kits use names or numbers to indicated the kit’s intended use. Purchasing a pre-made commercial kit allows the purchaser to get most of the necessary items along with a carrying case without having to purchase full boxes of many of the items for the kit. As you look at which kit to purchase and maintain, ask yourself the following questions: Who are you traveling with? Do you travel with groups, adults, kids or solo? The more people you travel with the more opportunities present themselves to use the items in your kit. With group travel, consider adding additional reserves of commonly used items such as adhesive bandages and pain relievers. For expeditions with adults at risk for heart conditions, ensure that aspirin is in the kit. Additionally, you may consider adding a dental kit with temporary filling for adults with a history of tooth issues. If kids are on the trip, small items like bandages with cartoon characters or a small toy can go a long way to decrease their stress. How long will you be out? Ensure that you have an inventory that matches the length of your trip . For longer trips, increase the number of common use items such as bandages, athletic tape, non-latex gloves and over-the-counter medications. The number of these items can be decreased on short day trips. On day trips to remote environments, consider bringing an emergency blanket in the case that injury lengthens your trip resulting in an unexpected overnight. What type of activity are you doing? The items carried in a first aid kit should match the potential illnesses or injuries that are associated with the activity. Hikers commonly experience blisters and musculoskeletal injuries, making it beneficial to have kit including bandages, mole foam, an elastic wrap and pain relievers. A nail clipper in a first aid kit can also can reduce many potential foot issues when on trail runs, day hikes, or backpacking trips. Boaters can add a small container of high strength sunscreen and sunglasses to reduce the potential of sunburn from the reflection of the sun on the water if they run out of (or forget) sunscreen or loose their sunglasses. What is your level of training? It does not make sense to carry items in your first aid kit that you do not know how to use. If there is something in your kit you do not understand, take time to research what the item is used for and how to use it appropriately. In addition to your current understanding of medicine, consider adding knowledge to what you carry with your first aid kit. Sample First Aid Kit Inventory If you need a place to start, check out LWM's first aid kit inventory list designed for a multi-day trip. Using this as a starting point, you can adjust what you carry based on all of the topics listed above. The LWM store is set up to support the purchase of small quantities of the items on the list to ensure that stocking a kit does not require a huge investment. Longleaf Wilderness Medicine courses address how to create first aid kits that will allow for response to minor and major emergencies. Check out a LWM course to develop your assessment and treatment skills for when the unexpected happens.
2 Comments
Outdoor recreation in the winter, including backcountry skiing, cross-country skiing, snowshoeing, and mountaineering, can be rewarding and enjoyable, as long as precautions are taken to mitigate risks. Freezing cold injuries, such as frostnip and frostbite, can quickly turn an adventure from a fun time into a serious incident. These types of injuries occur when heat loss in tissues exceeds the body’s ability to adequately perfuse them and prevent freezing (blood flow = heat). In cold temperatures, blood is shunted to vital organs in the core and away from the extremities, thus increasing the chance of a freezing injury. Prevention Prevention is always better than treatment. Prior planning and frequent assessments are key to frostnip and frostbite prevention.
Frostnip Frostnip is the precursor to superficial frostbite. Prior to warming, skin is cold, numb, and can have the appearance of frost on the surface. After warming, skin becomes red. With quick action, frostnip is easily reversible and results in no tissue damage. Superficial and Partial Thickness Frostbite If frostnip is not treated, freezing begins to occur in subsequent layers of tissue, and more permanent damage is possible. Signs of superficial frostbite include pale, “waxy,” skin, numbness, and tingling. The tissue may have no sensation and will feel cold to the touch. After rewarming, tissue will swell and become painful. In the case of partial thickness frostbite, clear, fluid-filled blisters appear. Deep Frostbite Deep frostbite affects all layers of skin, and in severe cases can cause damage to muscle and bone. When frozen, tissue can appear frosted, and is stiff to the touch and does not have sensation. Once rewarmed, deep frostbite is characterized by hemorrhagic blisters or necrotic (black) skin. It can take weeks to months before demarcation of damaged tissue is complete, which often results in amputation. Before rewarming, it is difficult to differentiate between superficial and deep frostbite. Treatment Frostnip – Rewarm the affected tissue by covering exposed skin (e.g., putting on gloves, covering your face clothing or a scarf), direct contact (e.g putting cold hands in your armpits), and finding shelter/limiting exposure to the elements. Frostbite - If there’s a possibility of refreezing, or if evacuation necessitates a walk-out, it’s better to keep the body part(s) frozen than to rewarm them. Refreezing substantially increases the risk of permanent damage and defrosted appendages are often swollen, blistered, and painful. However, tissues should not be intentionally kept frozen (i.e., the affected area should not be packed in snow) as it can result in further damage. If there is no chance of re-freezing, there are two rewarming options: Rapid rewarming (preferred) - Rewarm the tissue in a water bath kept consistently between 98.6 and 102.2°F (bathtub temperature). Circulating water helps to keep tissues at the correct temperature. Rewarming time depends on the extent of the freezing, but is complete when tissues are re-perfused and soft/pliable. After rewarming, dry the affected tissue with gentle blotting or let it air dry. Keep blisters intact, and if they drain spontaneously, provide basic wound care. Passive rewarming – While not as ideal, passive rewarming options can also be effective. These methods include moving to a warmer environment (sleeping bag, cabin, sitting next to a stove), or using body heat (placing affected tissue against someone else’s abdomen, or placing hands in your own armpits). Any individual who experiences a frostbite injury that cannot be rewarmed should be evacuated immediately. If the tissue is rewarmed, provide wound care and evacuate in a timely manner. Caitlin GaylordI peeked out the window of the Fairy Meadows Backcountry hut in B.C., Canada. I was hoping to see the mountains that had been hidden from view for the last four days. I smiled. Doubletop Mountain and Sentinel Peak were outlined against a backdrop of blue. It was January 11th, 2018. A few months prior, a family friend and owner of the Seattle guiding company Kaf Adventures, Mick Pearson, had won a permit to spend a week at a remote backcountry ski hut in the heart of the Selkirk mountains. So here I was along with my father, Mick, two additional Kaf guides, and five other skiers. I had new ski boots that were adjusted and custom-molded to my feet, and I had taken a few practice laps at Snoqualmie ski resort in Washington. The boots were comfortable then, but on the first day of the hut trip when I put my boots on, the inner lining pressed down on my big toenails. It was a little uncomfortable, but I ignored it. Looking back, this is when the trouble started. Before our first run on the second day of skiing, I forgot to toggle the lever on my boots that changes them from “walk mode” to “downhill mode, which creates stiffness and stability. An experienced resort skier but novice powder skier, I skied the run leaning too far back, flexing my feet against the boots. The next morning, my big toenails were sore and bruised so I took the day off. When I woke up on the 11th, my toes were less sore, and the clear skies were irresistible. With the cloud layer lifted, the temperature had dropped to -2°F. We layered up, discussing the importance of keeping breaks short and checking each other for signs of frostbite. Within the first 20 minutes of heading uphill, my toes tingled as they started to get cold. No problem, I thought. My toes had been cold the previous days, plus, the numbness would dampen my sore toenails. I was oblivious to the moment when the feeling in my toes went from painful and cold, to painless and cold; a crucial distinction that I, as an REMT, should have been aware of. With avalanche danger more tangible, I wasn’t thinking about my cold feet. It wasn’t until we neared the cabin after a six-hour ski tour that concern crept into my mind. When I wiggled my toes, I felt nothing. We came inside the cabin and I removed my boots and socks. The big toe on my left foot was completely white, cold the touch, and hard as wood, classic signs of frostbite. Like hypothermia and heat illnesses, frostnip and frostbite occur on a spectrum, and prevention is the best treatment. There were multiple mistakes I made throughout the day:
Because of these decisions and lack of action, I was now facing a bigger problem. Once I realized I had frostbite, others in the cabin helped evaluate the situation and strategize treatment. Since the hut was warm, we were isolated from the environment, and we wouldn’t have to walk or ski out, we began rewarming. I was extremely lucky we had ideal rewarming conditions. Despite our remote setting, we were able to rapidly heat water and had plastic basins that served as “hot tubs” for my feet. I spent the evening with my feet in hot water watching them turn from white, to purple, to red. Sometimes this process is called the “screaming barfies” as the pain associated with rewarming makes people want to scream and barf. While it wasn’t a pleasant experience, I don’t remember intense pain, though that may have been because of the Ibuprofen I was given. Within a few hours of rewarming, small blisters formed on my left big toe. One of the guides looked out the window and commented, “Well, it’s probably too late for a helicopter evacuation.” The mood in the hut shifted; suddenly my situation became more serious. I sat down with the guides and talked through the options. The helicopter (the only way in and out) would be coming in two days to pick us up as scheduled. There was a chance that the helicopter would be delayed by at least a day because of weather. Mick called a Kaf co-worker via satellite phone for an updated weather report. There was a slight chance of bad weather impending our travel, but it seemed relatively stable. The fluid in the blisters on my toe was clear, which meant there likely wasn't permanent tissue damage (often indicated by blood-filled blisters), but it was hard to know. A former ER physician who was a member of another party in the hut examined my toes. “I wouldn’t be surprised if later down the road you lost your toe,” he told me. In wilderness medicine, there is typically an element of uncertainty when making decisions. Location, weather, and availability of resources (communication, basic supplies, first aid material, human power, etc) can all complicate treatment and evacuation plans. Rarely is there a “right” answer, so we chose the “best” answer given what we knew and what we had. We decided to stay in the hut and await the scheduled helicopter, knowing there was a chance it could be delayed. We treated my toes as best we could given our resources and limitations, knowing the recovery might be better with definitive care. I was fortunate to have the best possible outcome. I flew out by helicopter as scheduled two days later and although both my big toenails were surgically removed eight days later, I didn’t suffer any permanent damage. Nine months after the ski trip, my toes and toenails were back to normal. I also learned important lessons about identifying and preventing frostbite that will not only help me but others who I hike and ski with in the future. 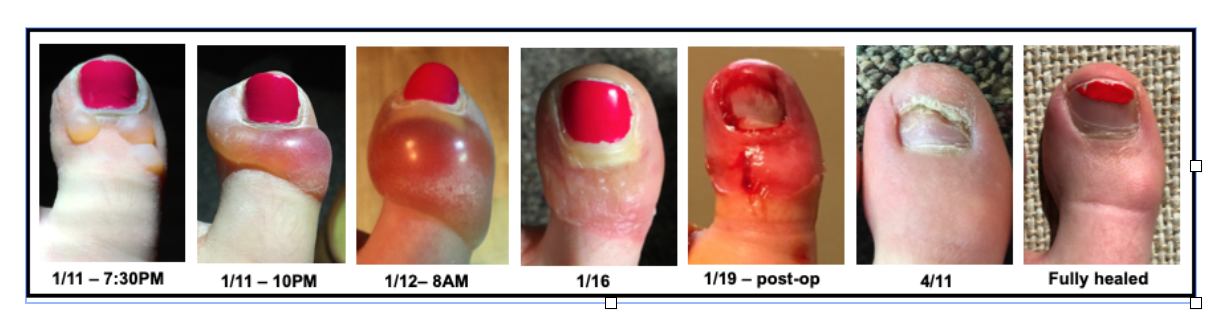 Caitlin GaylordThankfully Caitlin, an LWM instructor and current med student, still has all 10 of her toes. |
Archives
December 2020
Categories
All
|
 RSS Feed